Showing posts with label Kids' Chemistry. Show all posts

Wednesday, May 29, 2013

Kids' Chemistry: Crystals

Crystals are molecules making regular formations.  This is usually dictated by the chemical properties of the molecule.

Water, for example, is a not just H2O, it's H-O-H.  It's polar: the larger oxygen atom carries a slight charge which bends away from the smaller hydrogen atoms.  This creates a bend in the molecule and causes the water molecules to stick to each other in regular ways.  That's why all snowflakes form with six sides; water crystals are 6 sided.

We started out by looking at examples of crystals in our rock collection.  This was lots of fun, and we got to talk about how different imperfections affect the clarity, color, and shape of the finished crystal.  Pure quartz, for example, is clear.  But different contaminants give it other colors: rose quartz (pink), smoky quartz (brown), citrine (yellow),  or  amethyst (purple). Agate, jasper, carnelian, tiger's eye, and onyx are all other kinds of contaminated quartz.


Next we looked at some salt crystals we had grown earlier.  The crystals which formed quickly were small and irregular.  The ones which had formed more slowly were larger and more perfect.

Then we made rock candy by making a super saturated sugar solution (3 cups of sugar to 1 cup water).

I have had trouble making rock candy before, but this time it worked pretty well.  I dipped the popsicle sticks into the sugar solution, then rolled them in sugar to make seed crystals. before hanging them back in the solution.

After a week, they were large enough to enjoy, although they didn't grow as large (or perfect) as the commercially available rock candy.

Still, it's the most success I've had, and they tasted like sugar!

Lastly, I tried an experiment I've wanted to do since I was a kid: grow a crystal garden!

I never got to do this because my Mom could never find bluing.  But I have the internet!
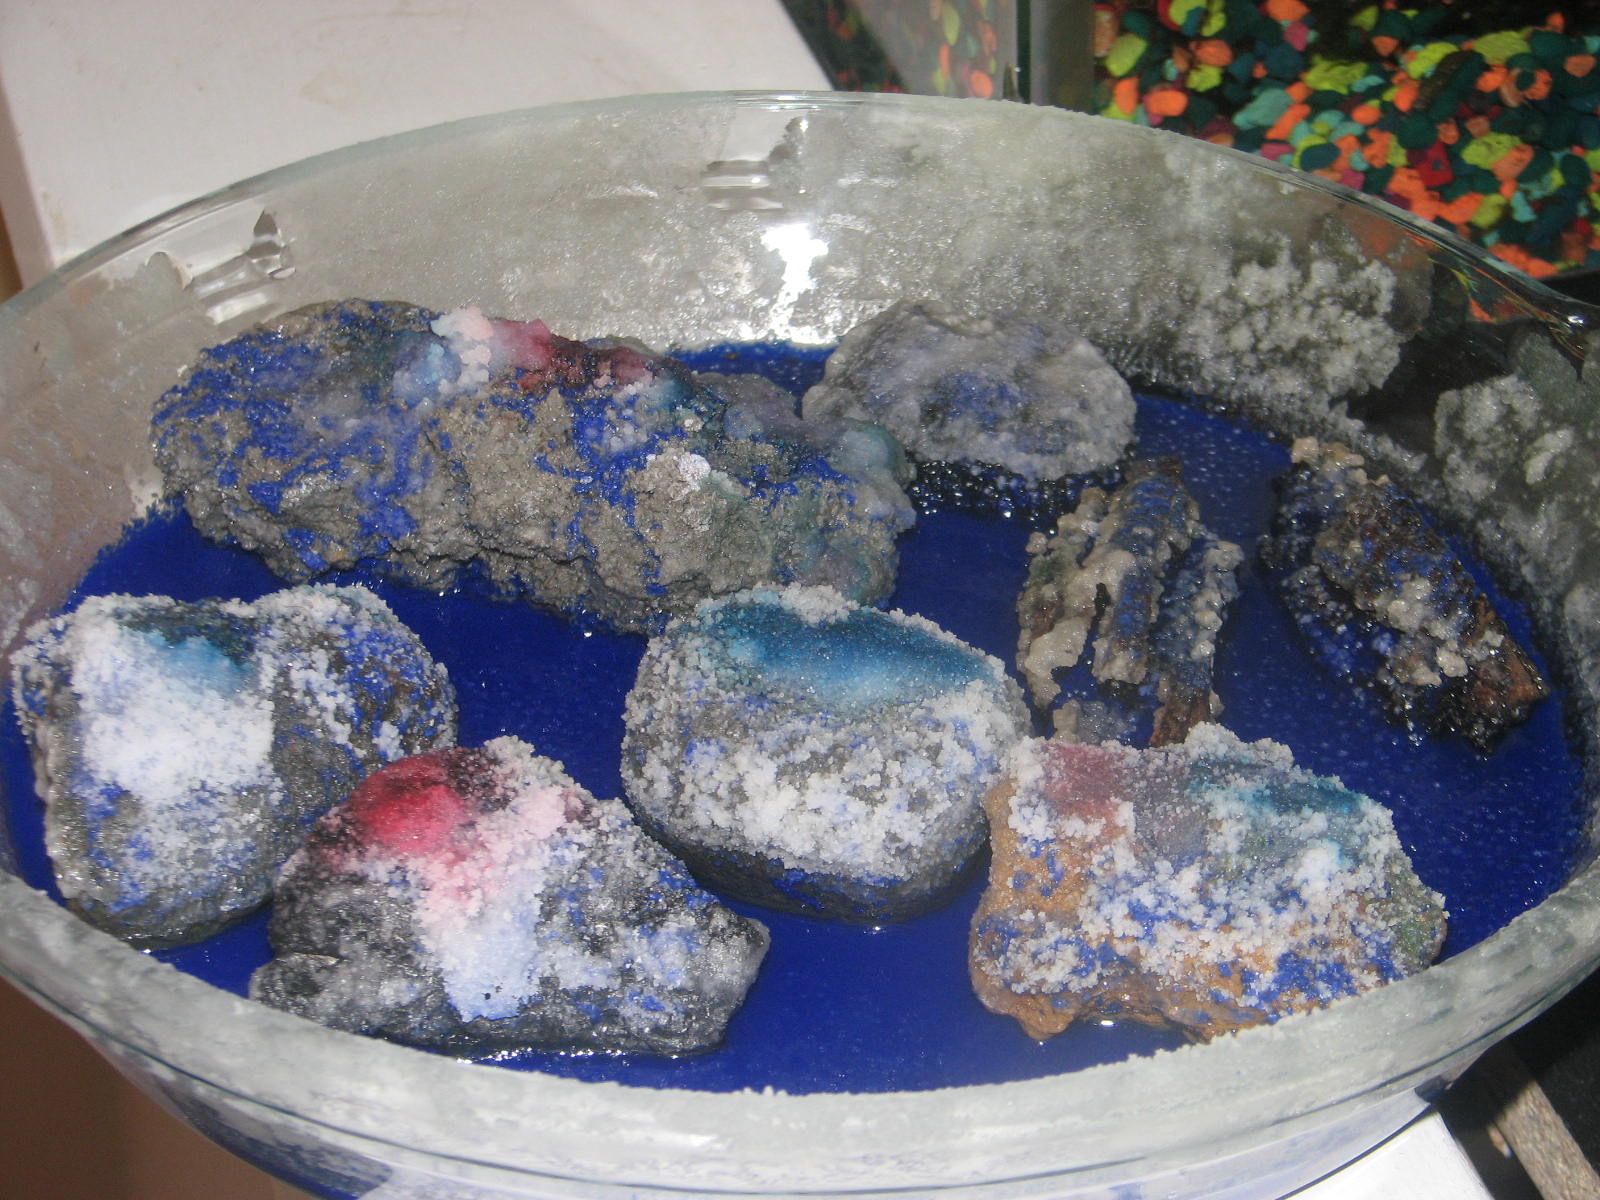
Here's what you need:
a dish or pie plate
porous substrate: bricks, concrete, charcoal, coal, even wood
2 parts water
4 parts non-iodized salt
2 parts ammonia
2 parts bluing

Put the substrate in the dish.
Mix the rest of the ingredients and pour them over the substrate.
When the liquid is gone, you can make more and add it to the dish (not on the crystals) to keep the crystals growing.

Here's what is happening: you are growing contaminated salt crystals.  The bluing breaks up the cubical form of natural salt crystals to give a feathery "flowery" growth.  The ammonia increases the evaporation and makes the crystals form faster (also interfering with their regular shape).  You know the contaminants make these salt crystals toxic, right?

And that was it for our Kids' Chemistry!  Hooray!  We made it!  And I hope it helps anyone else out there who wants to do a little chemistry exploration with kids!

Thursday, May 16, 2013

Kids' Chemistry: Acids and Bases

"This will be a basic science class," the teacher said acidly.

At any rate, you can't talk about chemistry with out talking about acids and bases.

An acid is a chemical with extra hydronium (H+) ions.  It tastes sour (but you don't want to taste many of them), feels astringent, reacts with metals (remember rusting steel wool with vinegar?) and bases (baking soda and vinegar anyone?), and it turns indicator strips red. It also can burn you if the acid is strong enough.

 A base, on the other hand, is a chemical with extra hydroxide (OH-) ions.  It tastes bitter (do you want to taste one?), feels slippery or soapy, reacts with acids, and it turns indicator strips blue.  It also can burn you if the base is strong enough.

When an acid reacts with a base, that H+ and OH- get together and form... H2O, water!  The rest of the acid and base form a salt.

Not necessarily salt, but a salt.  There are a lot of salts in chemistry, and not many of them are edible!  I asked the kids what color a salt was.  They said white, which is correct, but a salt can also be red, blue, green, yellow, orange, or purple.  Next I asked them how a salt tastes.  Salty, of course!  But a salt can also taste sweet, sour, bitter, or umami (MSG is a salt).

Next up, the pH scale.  This is a scale which tells you how  acidic an acid is and how basic a base is.  On a scale of 0 to 14, 7 is neutral, anything higher than a 7 is basic, and anything lower than 7 is acidic.  I didn't go into the fact that you can have acids lower than 0, and bases higher than 14, but you can.  If that sounds more dangerous than anything they are likely encounter before grad school, it is, particularly when you consider that the pH scale is logarithmic: each number you go down (or up) is 10 times as acidic (or basic) as the last.

At any rate, I had set out 13 random carefully selected substances for them to test, along with pH strips and a table to record their findings (Hey, look!  Something from the class that we can actually put in our portfolios!).

We had everything from laundry detergent to pickle juice, but my favorites were milk (base) and buttermilk (acid).


Then it was back to the kitchen floor for the demonstration reactions!
I had put baking soda (and a drop of soap) in a graduated cylinder and I poured in some vinegar.  It foamed and overflowed obligingly.  We poured in more vinegar.  It reacted again.  But, eventually, the reaction stopped, no matter how much vinegar we added.  We had "used up" the baking soda, of course, but in chemistry we say, "The baking soda was the limiting reagent."

So we added more baking soda, and it reacted again!  This time we kept adding baking soda until the reaction stopped, or, The vinegar was the limiting reagent."  I suspect the kids could have gone on and on all day adding one reagent then the other, but I had one more thing I wanted them to see.

Will an acid and a base always react with each other?

There is one circumstance where they won't.  I am holding a bath fizzy which we made around Christmas time.  Bath fizzies are basically powdered citric acid mixed with baking soda. The acid and base don't react with each other because the acid base reaction requires water!

Regular baking powder works the same way,which is why baking powder goes bad if exposed to enough humidity (double acting baking powder has a third component that activates when exposed to  heat).  Plain baking powder is baking soda with tartaric acid, which is why you use baking soda with cream of tartar if you ever run out of baking powder.  I've never been able to use that fact because I always run out of cream of tartar before I run out of baking powder, but your mileage may vary!

The kids had lots of  fun putting the bath fizzies in water and watching them fizz.  They also tried putting baking powder in the water in pinches and powdery handfuls.  Makes me glad I buy baking powder in one pound containers at the warehouse club.  It'll be the first time I used one up completely before it lost strength!

Tune in next week for our last chemistry class when we'll be looking at crystal formation!

Thursday, April 25, 2013

Kids' Chemistry: Heat

  We've been discussing heat from the very beginning, so the kids knew that heat was energy, and that heat energy was expressed in the movement of molecules.  You've got to love it when the kindergarteners can tell you that molecules move faster when they are hotter, and slower when they are colder.  They get it!

Anyway, they also remembered that heat caused an increase in reaction rates: it sped up the dissolution of the bouillon cubes, and it sped up diffusion.

 I also wanted them to see that heat affects density in liquids and gases.  I used 2 wide mouthed quart jars, and two little (8oz) soda bottles.

I put ice water in one little bottle and tinted it dark blue, then sealed it with foil and a rubber band.  I filled the quart jar with hot (tap water, not boiling hot) water. Then I pierced the foil with a pencil tip and dropped a few drops of the cold blue water into the hot clear water.

The cold water fell quickly.

This is the basis of certain ocean currents.  In real life, water density based on temperature moves millions, if not billions of tons of water!

Next I filled the other bottle with hot water, dyed red, and sealed it with foil and a rubber band.

I placed the sealed bottle into the wide mouthed jar, then filled the rest of the jar with cold water (strained ice water).

Next I pierced the foil on the hot water with a pencil tip.

The red water rose to the top, looking very much like a volcano!

 We moved on to gases.  Before class, I had placed an empty, uncapped soda bottle in the freezer.  Now I took it out and capped it with a quarter.

Theoretically, as the air in the bottle warmed and expanded, the coin would clatter and move.

Actually, the bottle got knocked over (twice!) and was filled with room temperature air.  So, your mileage may vary! 

Since the bottle was full of warm air, I reversed the experiment by capping the bottle (with, you know, the bottle cap) and stuck that in the freezer.  By the end of the class it was cold enough to shrivel the bottle.  The kids asked what would happen if we left it in all week, so we left it there, plus added a bottle of water.

Next up, we looked at how light was absorbed and converted into heat.  I had a (florescent) light bulb shining on black and white paper.  Theoretically, I would have had a thermometer under each sheet of paper, but a surface reading thermometer was more fun if you have one!

The black paper was two degrees warmer than the white.

 Lastly, we looked at heat absorbed and released in chemical reactions.

I stuffed a jar with fine grade steel wool, then poured in some vinegar.  I sealed it with a double layer of foil, then put a cooking thermometer through the foil into the center of the steel wool.

Over the course of 10 minutes, the temperature went up about 2 degrees- rust really is burning in slow motion!

 Then I dissolved half a cup of non chlorine bleach (Oxyclean) in water.  I had everyone touch the jar before we started so that they could feel that the water was room temperature.

Naturally, everyone wanted to stir!

I didn't use a thermometer on this one, but the kids all could feel the jar growing warmer.

For my piece de resistance, I did "hot ice."  This is sodium acetate, the stuff used in hand warmers.  It's reasonably non toxic, and available on Amazon

You need 160 grams of sodium acetate (which is the amount in the beaker) dissolved in only 30ml of water (which is the amount in the graduated cylinder).  It looks like a ridiculous proportion of solid to liquid - and it is!

But this is a case where a relatively low saturation point is very affected by temperature.

 If you heat the mixture in a boiling water bath, the entire amount will go into solution, and it will stay in solution as mixture cools.  This is called a super saturated solution.

And it only takes one tiny sodium acetate crystal (or even a hard tap on the side of the jar) to cause the sodium acetate to fall out of solution.

It instantly blooms into beautiful crystals and releases all that stored up heat you used to coax it into solution.

The best part is that you can put those crystals  (now a solid block with no visible water) back into solution by adding more heat, so your sodium acetate is completely reusable!


Tuesday, April 9, 2013

Kids' Chemistry: Phase Changes

I think the 2 most essential things for kids to understand about phase changes is that atoms and molecules are attracted to ("stick to") each other, and that phase changes require energy.

The reason that everything isn't solid is that energy (which we perceive as heat) makes the atoms and molecules move, and the faster they are moving the harder it is for them to "stick" to each other.

To illustrate this, I had the kids play Crack the Whip.  If you haven't played in a while, the kids hold hands in a line and one kid on the end starts walking, then running, making curves.  When they are moving slowly, it's pretty easy for all the kids to stick together.  As they speed up, it gets harder and harder, and eventually, the kids on the end go flying off.

That's a lot like what happens when water boils!

We talked about the phase changes:
Freezing (liquid to solid)
Melting/thawing (solid to liquid)
Evaporation/boiling (liquid to gas)
Condensation (gas to liquid)
Sublimation (solid to gas - think dry ice)
Deposition (gas to solid - this is how artificial diamonds are made)

Then I had them all be molecules and, as I called out phase changes, they altered their motion to suit the change.  Very fun!

We next worked on altering phase changes.  I had put a pot of water on to boil, and we measured it's temperature: 212 degrees.  The idea that water doesn't get any hotter than that, even if you add more heat, was a bit of a new concept for them, so I stayed with that for a while.

I also explained the Fahrenheit and Celsius systems.  Then I dumped 2 cups of salt into the boiling water and got the temperature up to a whopping 227 degrees!

Never one to be wasteful, I then put the potatoes in to cook for dinner.

Next we altered things in the other direction.  I had two jars with ice and a little water.  I put rock salt into one, and then had the kids feel the difference in temperature between the jars. Given enough time, and a cooler room, the salt water jar would have gotten frosty.

Breaking the bond between sodium and chlorine in the salt takes energy, and the salt gets that energy from heat in the ice.  This doesn't make it warmer, it makes it colder because more energy has been absorbed.(converted from heat into chemical energy).

I used to wonder why the ice would melt if the salt was making it colder.  The answer is that the charged sodium and chlorine ions pull the polar (charged) water molecules away from the ice crystals, back into a liquid state.  Interestingly, 0 degrees Fahrenheit is the temperature at which a saturated salt solution freezes.  I still like Celsius better.

Anyway, to get back to the greater significance of salt lowering the temperature of ice, this is how we make ice cream by chilling the container below the freezing point of cream by harnessing the power of ice and salt! Mmmmm.  Ice creammmm.

Anyway, we also picked up ice cubes with thread.  We had mixed success with this because the room was very warm, but the idea is to lay the thread on the ice cube, then sprinkle salt over it.  The salt melts the ice, but chills it enough to refreeze around the thread.  You need cotton thread for this.


Lastly, we looked at evaporative cooling.  This is a good way to concretely experience the need for energy in order to make a phase change.

I had a bottle of alcohol and a bottle of water at room temperature.  I put some of each on cotton balls, then rubbed them both on kids' arms.

I happened to have a scanning thermometer that records surface temperatures (thanks Mumpy!), but you can feel the difference in any case.  The water feels one temperature as it goes on your arm, then the whole area feels cooler as the water evaporates.  In order to make the jump from liquid to gas, the water has "stolen" heat energy from your arm.  You feel the loss of heat as "coolness." That's why sweating works!  The alcohol does the same thing, but, since it evaporates faster, it removes energy more quickly and feels cooler.

Wednesday, March 20, 2013

Gas Chemistry

 After several times forgetting to take pictures during class, this time I gave Klenda the camera - thanks Klenda!
 We started out talking about how we know something is a solid, liquid, or gas.

The kids came pretty close with solids and liquids!  A solid holds it's shape, a liquid takes the shape of it's container.  But a gas is harder to define!  A gas takes the shape of it's container and is compressible!  Liquids, by definition, are not compressible, hence the field of hydraulics.

To show that a gas is compressible, I decompressed some gas in a way the kids could feel: I popped a balloon and let them feel the puff of expanding air!

Next we talked about mixtures.  Mixtures of solids (Old Bay), liquids (milk in tea), and gases (air).  The mixtures of solid and liquid (sugar in tea), solid and gas (smoke), liquid and gas (fog) and, the one we worked with most, gas in liquid (soda!)

I had bought 10 little "chubby" sodas in "blueberry."  These were selected primarily because I needed the bottles for the next experiment, but also because it was transparent.

First the kids needed to drink a little to make room in the bottle!  Then they dropped in alphabet noodles (uncooked).  The gas bubbles formed on the outside of the noodles, raising them to the top, and then dropping them back to the bottom as the gas released at surface.  Fun, dancing noodles!

Then we put salt in the soda.  The salt provides lots of surface area (nucleation sites) for the gas to form from the liquid, and it makes the soda foam and over flow!!

Then we rinsed the bottles and filled them partially with vinegar.  I had pre loaded balloons with baking soda and the older kids helped fit the necks of the balloons around the necks of the bottles.

The kids tipped the balloons up, the baking soda fell into the vinegar, and the balloons inflated with carbon dioxide!

This is my favorite kid experiment!  We tied off the balloons and had the kids experiment with them.  COis heavier than air, so the balloons fall unexpectedly quickly.  I also provided some air filled, and some helium filled balloons for contrast.  So fun!  Try listening through the different balloons!


  Next I had the kids blow into lime water.  The water itself is made by putting canning lime in water overnight.  The excess lime settles out, leaving you with water containing a lot of calcium oxide (lime).

When calcium oxide meets carbon dioxide, it combines into tiny particles of calcium carbonate (limestone), and the water turns milky. You make rocks with your breath!!

 Eventually, the limestone settles to the bottom.  Very cool!

We also tried an experiment where we put yeast with sugar water in a sealed bottle with a tube to vent the CO2 into a container of lime water.

The water should turn milky over the course of a day or so. Unfortunately, I over did the yeast, and got an overflow of yeasty mess.  Oops!  My fault for not trying the experiment before hand.

But this was a super fun class, anyway!


Wednesday, March 6, 2013

Chemistry That Matters

 Our second class finished our study of Matter - next week we will move on to Forces.

We started out with inertia.  Each child had a mason jar with a playing card set over the mouth of the jar, and a quarter sitting on top of the card.  If you flick the card with your finger, the card shoots out and the quarter (because of it's inertia) stays in place until gravity causes it to drop into the jar.

I was a bit concerned that the 5 year olds in the class wouldn't have the dexterity to flick the card, but they were great!  I think it helped to use the slippery playing cards rather than the index cards the book called for on this one.

Next we looked at changes in matter: physical changes, phase changes, and chemical changes.

 Starting with the physical, I held up a 4x6 index card and asked the kids if I could stretch the card all the way around me.  I pulled and tugged at the card, but they didn't think I could do it.

I proposed that I cut the card to make it longer.  Well that was a hilarious suggestion!  Everyone knows cutting things makes them shorter!

Except this zig zag cut stretched the card out to about 4 1/2 feet! (Yes, it did fit around me.)

Moving on to phase changes, I handed each kid an ice cube and let them put it in their mouth.  Of course the ice turned to water. I then passed around a mirror and had them all breathe on it so that they could see the water vapor.

Presto!  All three common forms of matter...in their mouths... at the same time!

I skipped demonstrating a chemical change (although we talked about it) in favor of the kids suggestion that we microwave the ice cubes and watch what happened. Better to nurture the spirit of inquiry than get through my lesson plan!

We talked about atoms, particularly the fact that the nucleus was positive and the outer shells are negative.  We demonstrated by letting the kids rub balloons on their heads and then using the charged balloon to make confetti (thoughtfully supplied by my 3 hole punch) "dance."


 I mentioned that atoms are always in motion and that this energy we perceive as heat.  I filled one jar with chilled water, one with room temperature, and one with hot water.  Then I dropped some liquid watercolor into each jar.  The watercolor dropped to the bottom of the cold water, swirled about in the lukewarm, and diffused rapidly in the hot.  I'm always surprised at how fascinated kids are by this.  It's easy and virtually no mess - I should do it more often!

I wanted to look at how atoms and molecules interact, so I filled one jar (far left) with two cups of water. Mason jars are great for this because they have measuring marks on their sides (but use an accurate liquid measure to put the ingredients in!).

For the next jar, I put in one cup of water and one cup of 91% isoproponal (rubbing alcohol).  That's the middle jar, and you can see it doesn't measure up to the whole 2 cups!

In the jar on the right, I put one cup of sugar, and one cup of water then put on a lid and let the kids shake it! In that jar we are "missing" about a 1/2 cup of matter!  The sugar and alcohol molecules slid between the water molecules which takes up less space.

Lastly, we played around with density.  The floating egg is in a salt water solution.  The sinking egg is in plain water with a few drops of milk added to mimic the look of the brine. It was a close enough look that I couldn't tell them apart without the eggs!

I had intended to do a little more density by asking them the "What weighs more, a pound of feathers or a pound of coins?" question, but I forgot it until I reviewed my notes.

The way that I like to explain to little kids about mass and density is this:  have them jump as hard as they can, so they really feel the jolt of their own mass as they land (works best inside on a floor that makes a lot of noise and moves a bit).  Tell them mass is the amount of stuff that they have inside them. Show them that I have more mass, more stuff in me (when I jump, I shake the floor more!).

Then explain that density is how much stuff is packed into a particular space. I like to hand them a golf ball and a ping pong ball.  They're about the same size, but the golf ball has more stuff packed into that space.


Tuesday, February 26, 2013

Chemistry for Kids

 After the enormous chemistry class for high school last semester, I am finally getting around to chemistry for the younger set.  In reality, all six Zoomlians are having fun with this, in addition to four from our friendly neighborhood home school family!

I am loosely following Janice Van Cleave's Chemistry for Every Kid.   Honestly, I love all her books.  I'm pretty picky about science experiments, but her books are gold mines!

We started out talking about matter, and our ability to experience matter through our senses.

We used taste to discover which bowl held salt and which one had sugar.

We used sight to find something made of matter and non-matter (people!).


Smells great!

 We used smell to figure out what was on the cotton balls stuck in film canisters.  This was so fun!  I used extracts from cooking (vanilla, lemon oil, cinnamon oil, almond extract), and from soap making (cedar oil, honeysuckle, bergamot, eucalyptus, lavender).

We used hearing to find my cell phone (which I had hidden with the timer running - sure glad that experiment worked!).


I think it's a...
And we used touch to discover what was in the "feely bag."

I don't know if you've ever tried this, but it's a great party game/ way to settle the shrieking hordes on a rainy day.  Not that I ever get shrieking hordes running around the house until some one gets hurt, you understand.

You just take a pillow case and wander around the house filling it with whatever random junk you trip over a carefully selected array of interesting objects.  The kid or kids have to feel inside the pillowcase without looking inside, and guess what is in there.


We also talked about matter taking up space and having mass.  This is always very interesting, especially as it refers to air.  It's so invisible and hard to sense, that revealing these properties seems like magic.

We did the wad of paper in an inverted jar under water trick.  For once, I had the foresight to write on the paper, "Hey, look!  I'm still dry!"  This amused the kids no end since, it was, in fact, still dry!

We also did the balloon in the bottle trick (which Mxyl is holding).  You put a balloon into the bottle with the neck of the balloon over the neck of the bottle.  It looks like you could just blow up the balloon inside the bottle, but, of course, the air in the bottle (but outside the balloon) takes up too much space to let the balloon inflate.

To show that air has mass, we weighed an empty balloon and a full one.  A word of caution on this one.  The difference is often only a gram (or less!) so only try this if you have a scientific scale (which I had because I bought on for the high school chem class!).  Also, I needed to add a loop of tape (to get the balloon to stay on the balance) and tare the scale beforehand.

When I was setting up the class,  I tried to make this work on my primary balance, and it actually showed the opposite because the air circulation in the house was adding force to the inflated balloon!

Lastly, I had given each kid a jar partially filled with rice and had them shake it side to side (not up and down - we got the best result by tapping the jar against our hands).  As the rice settled, the ball hidden in each jar rose to the surface showing that two objects can't occupy the same space at the same time.

And then we were out of time!  But tune in next week for at least as much fun!